Building a fireplace surround is a rewarding and creative project that can significantly enhance the visual appeal of a room. Before embarking on this venture, it’s crucial to start with comprehensive plans to guide the construction process. Begin by measuring the dimensions of the existing fireplace and surrounding space. Accurate measurements ensure that the fireplace surround fits seamlessly and harmoniously within the room. Consider the desired style and aesthetic, as this will influence the choice of materials and design elements. Traditional fireplace surrounds often feature classic woodworking details like molding and mantels, while modern designs may incorporate sleek lines and minimalist features. Detailed plans should include a list of materials, precise measurements, and a step-by-step construction guide.
Images about How To Build Fireplace Surround Plans
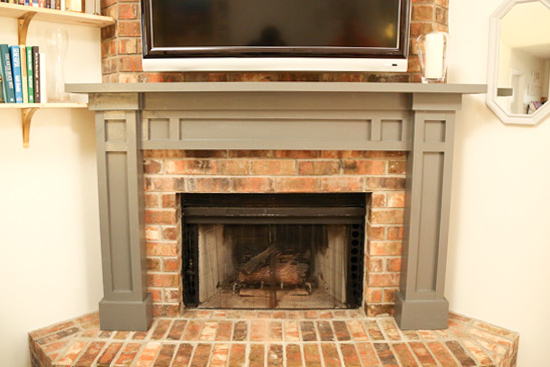
How To Build Fireplace Surround Plans
Material selection is a key factor in fireplace surround plans, as it determines the overall look, durability, and maintenance of the finished project. Common materials for fireplace surrounds include wood, stone, tile, or a combination of these. Wood provides a timeless and warm appearance, with various species and finishes to choose from. Stone offers a rustic and natural look, while tile provides endless possibilities for patterns and colors. Each material has its installation requirements and considerations, so the chosen material should align with both the design vision and practical aspects of the room. Fireplace surround plans should also account for any additional features, such as shelves, cabinets, or integrated storage, enhancing the functionality of the surround.
Detailed construction plans for a fireplace surround should cover the step-by-step process of building the structure. For wood surrounds, this may involve creating a frame using plywood or MDF (medium-density fiberboard) and then attaching the decorative elements, such as moldings or panels. Stone surrounds require careful consideration of the type of adhesive or mortar needed for proper attachment. Tile surrounds involve precise layout planning to achieve symmetrical patterns and uniform grout lines. Plans should also address the finishing touches, such as paint, stain, or sealant, to protect the fireplace surround and enhance its appearance.

Safety considerations are paramount in fireplace surround plans, especially if the fireplace is functional. Ensure that the materials chosen for the surround are fire-resistant and comply with local building codes. If the fireplace is equipped with a heating unit, proper clearances must be maintained to prevent overheating and fire hazards. Ventilation requirements should also be addressed to ensure proper airflow and prevent the buildup of heat. It’s advisable to consult with professionals or refer to industry guidelines to guarantee that the fireplace surround plans prioritize safety.
Building a fireplace surround is a comprehensive project that involves careful planning, material selection, and adherence to safety standards. Well-detailed plans serve as a roadmap for the construction process, guiding the builder through each step and ensuring a successful outcome. Whether creating a classic wooden surround or a contemporary tile masterpiece, the execution of well-laid plans results in a fireplace surround that not only enhances the aesthetics of the room but also adds value and character to the home.
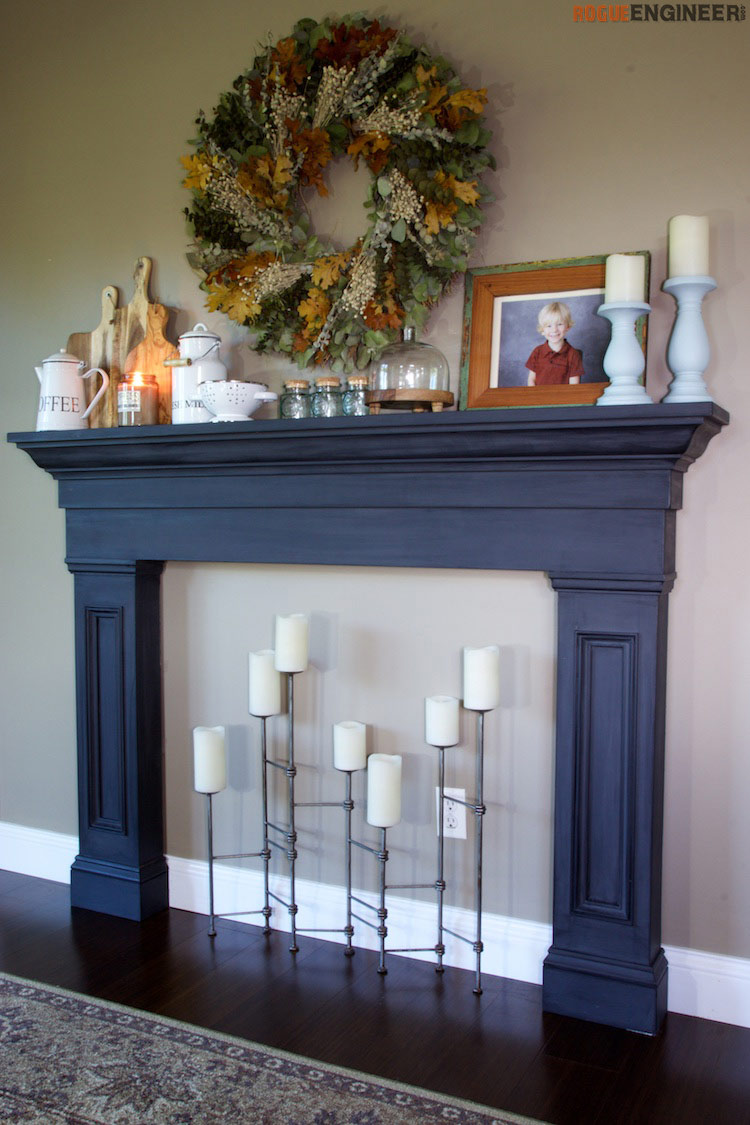
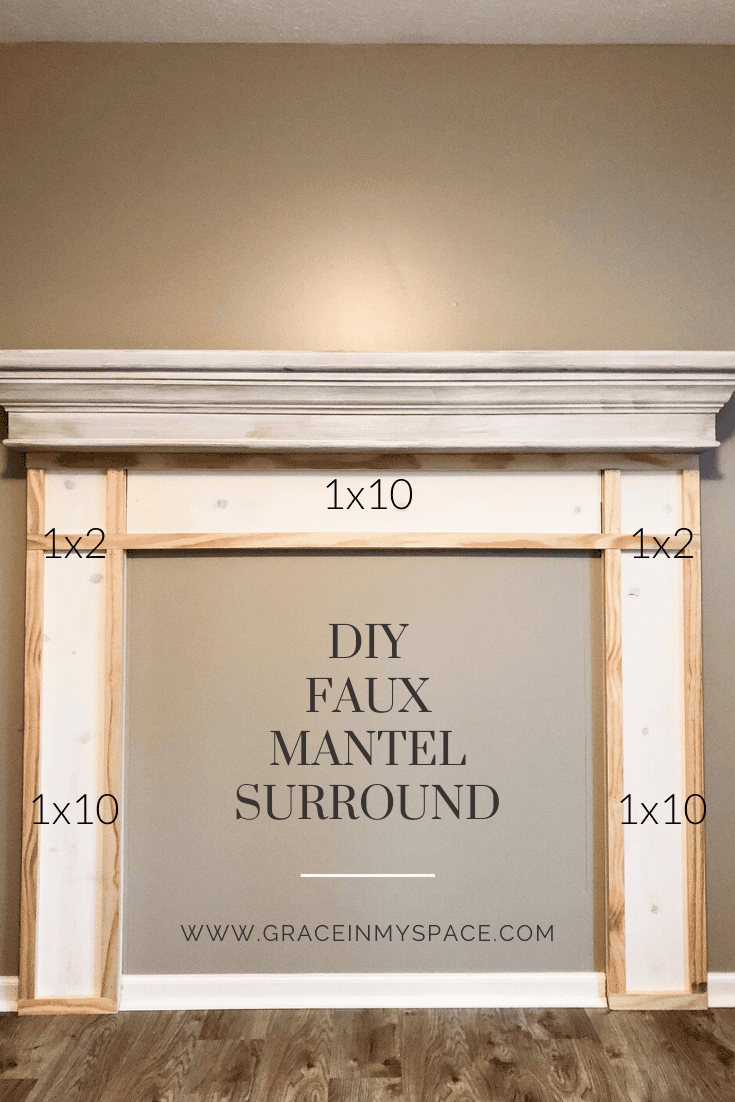
Faux Fireplace Mantel Surround » Rogue Engineer
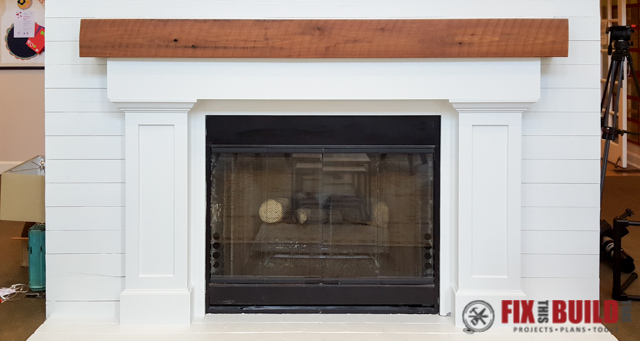
DIY Faux Fireplace Mantel Tutorial – Grace In My Space
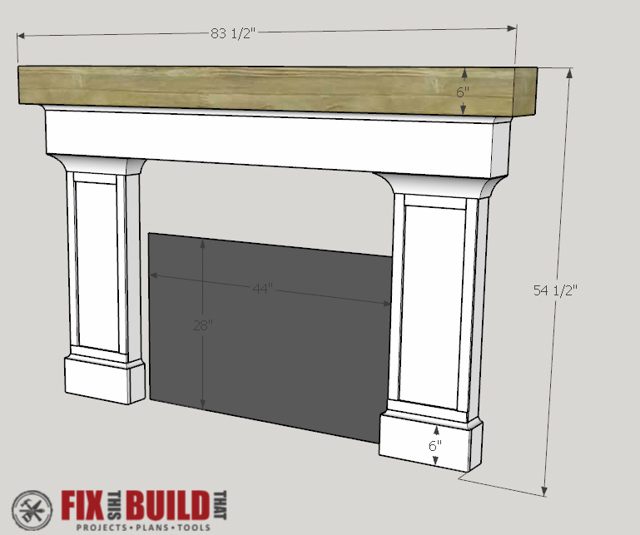
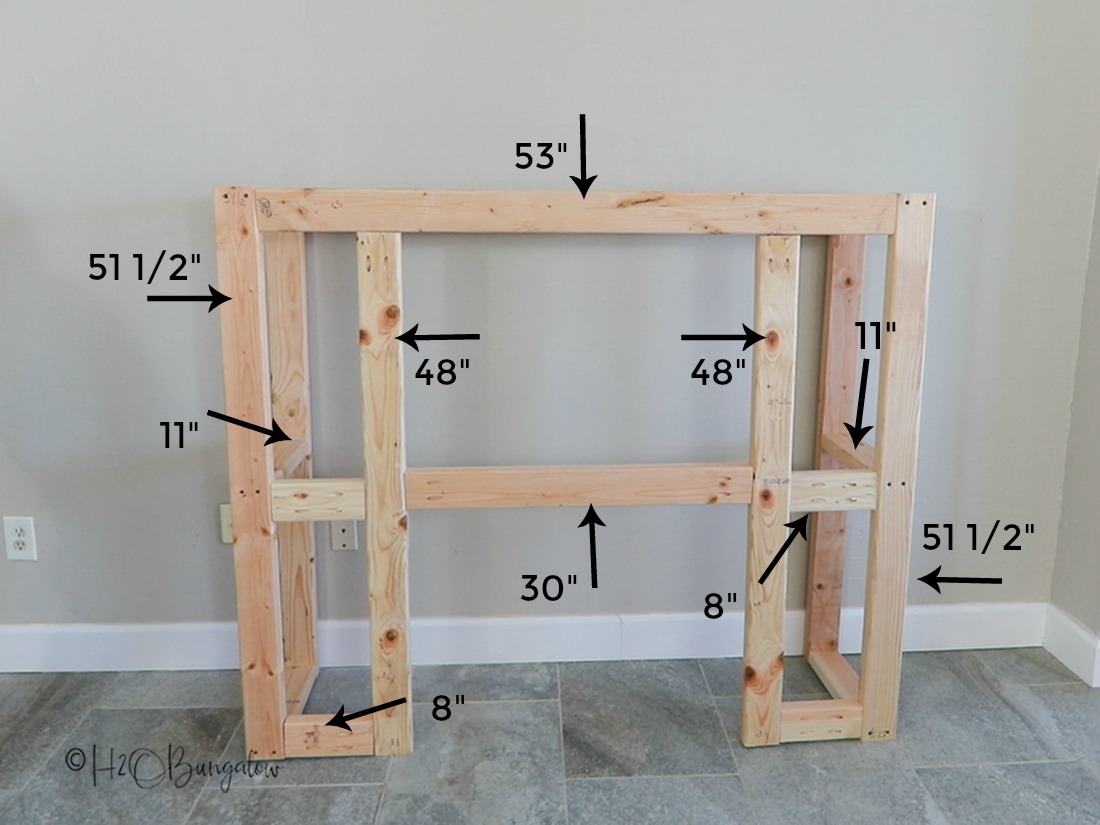
How to Build a Fireplace Surround and Mantel
How To Build a DIY Fireplace With Electric Insert
How to Build a Shaker Fireplace Surround DIY Project Woodworking Project

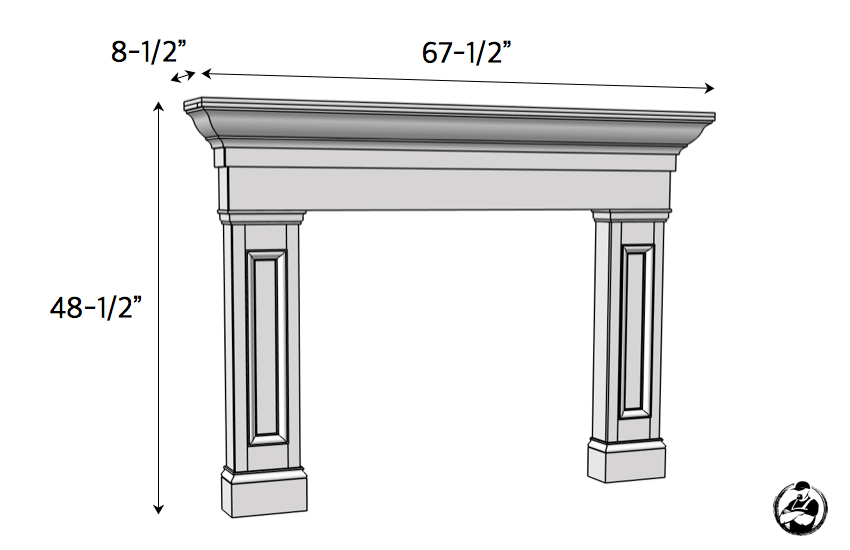
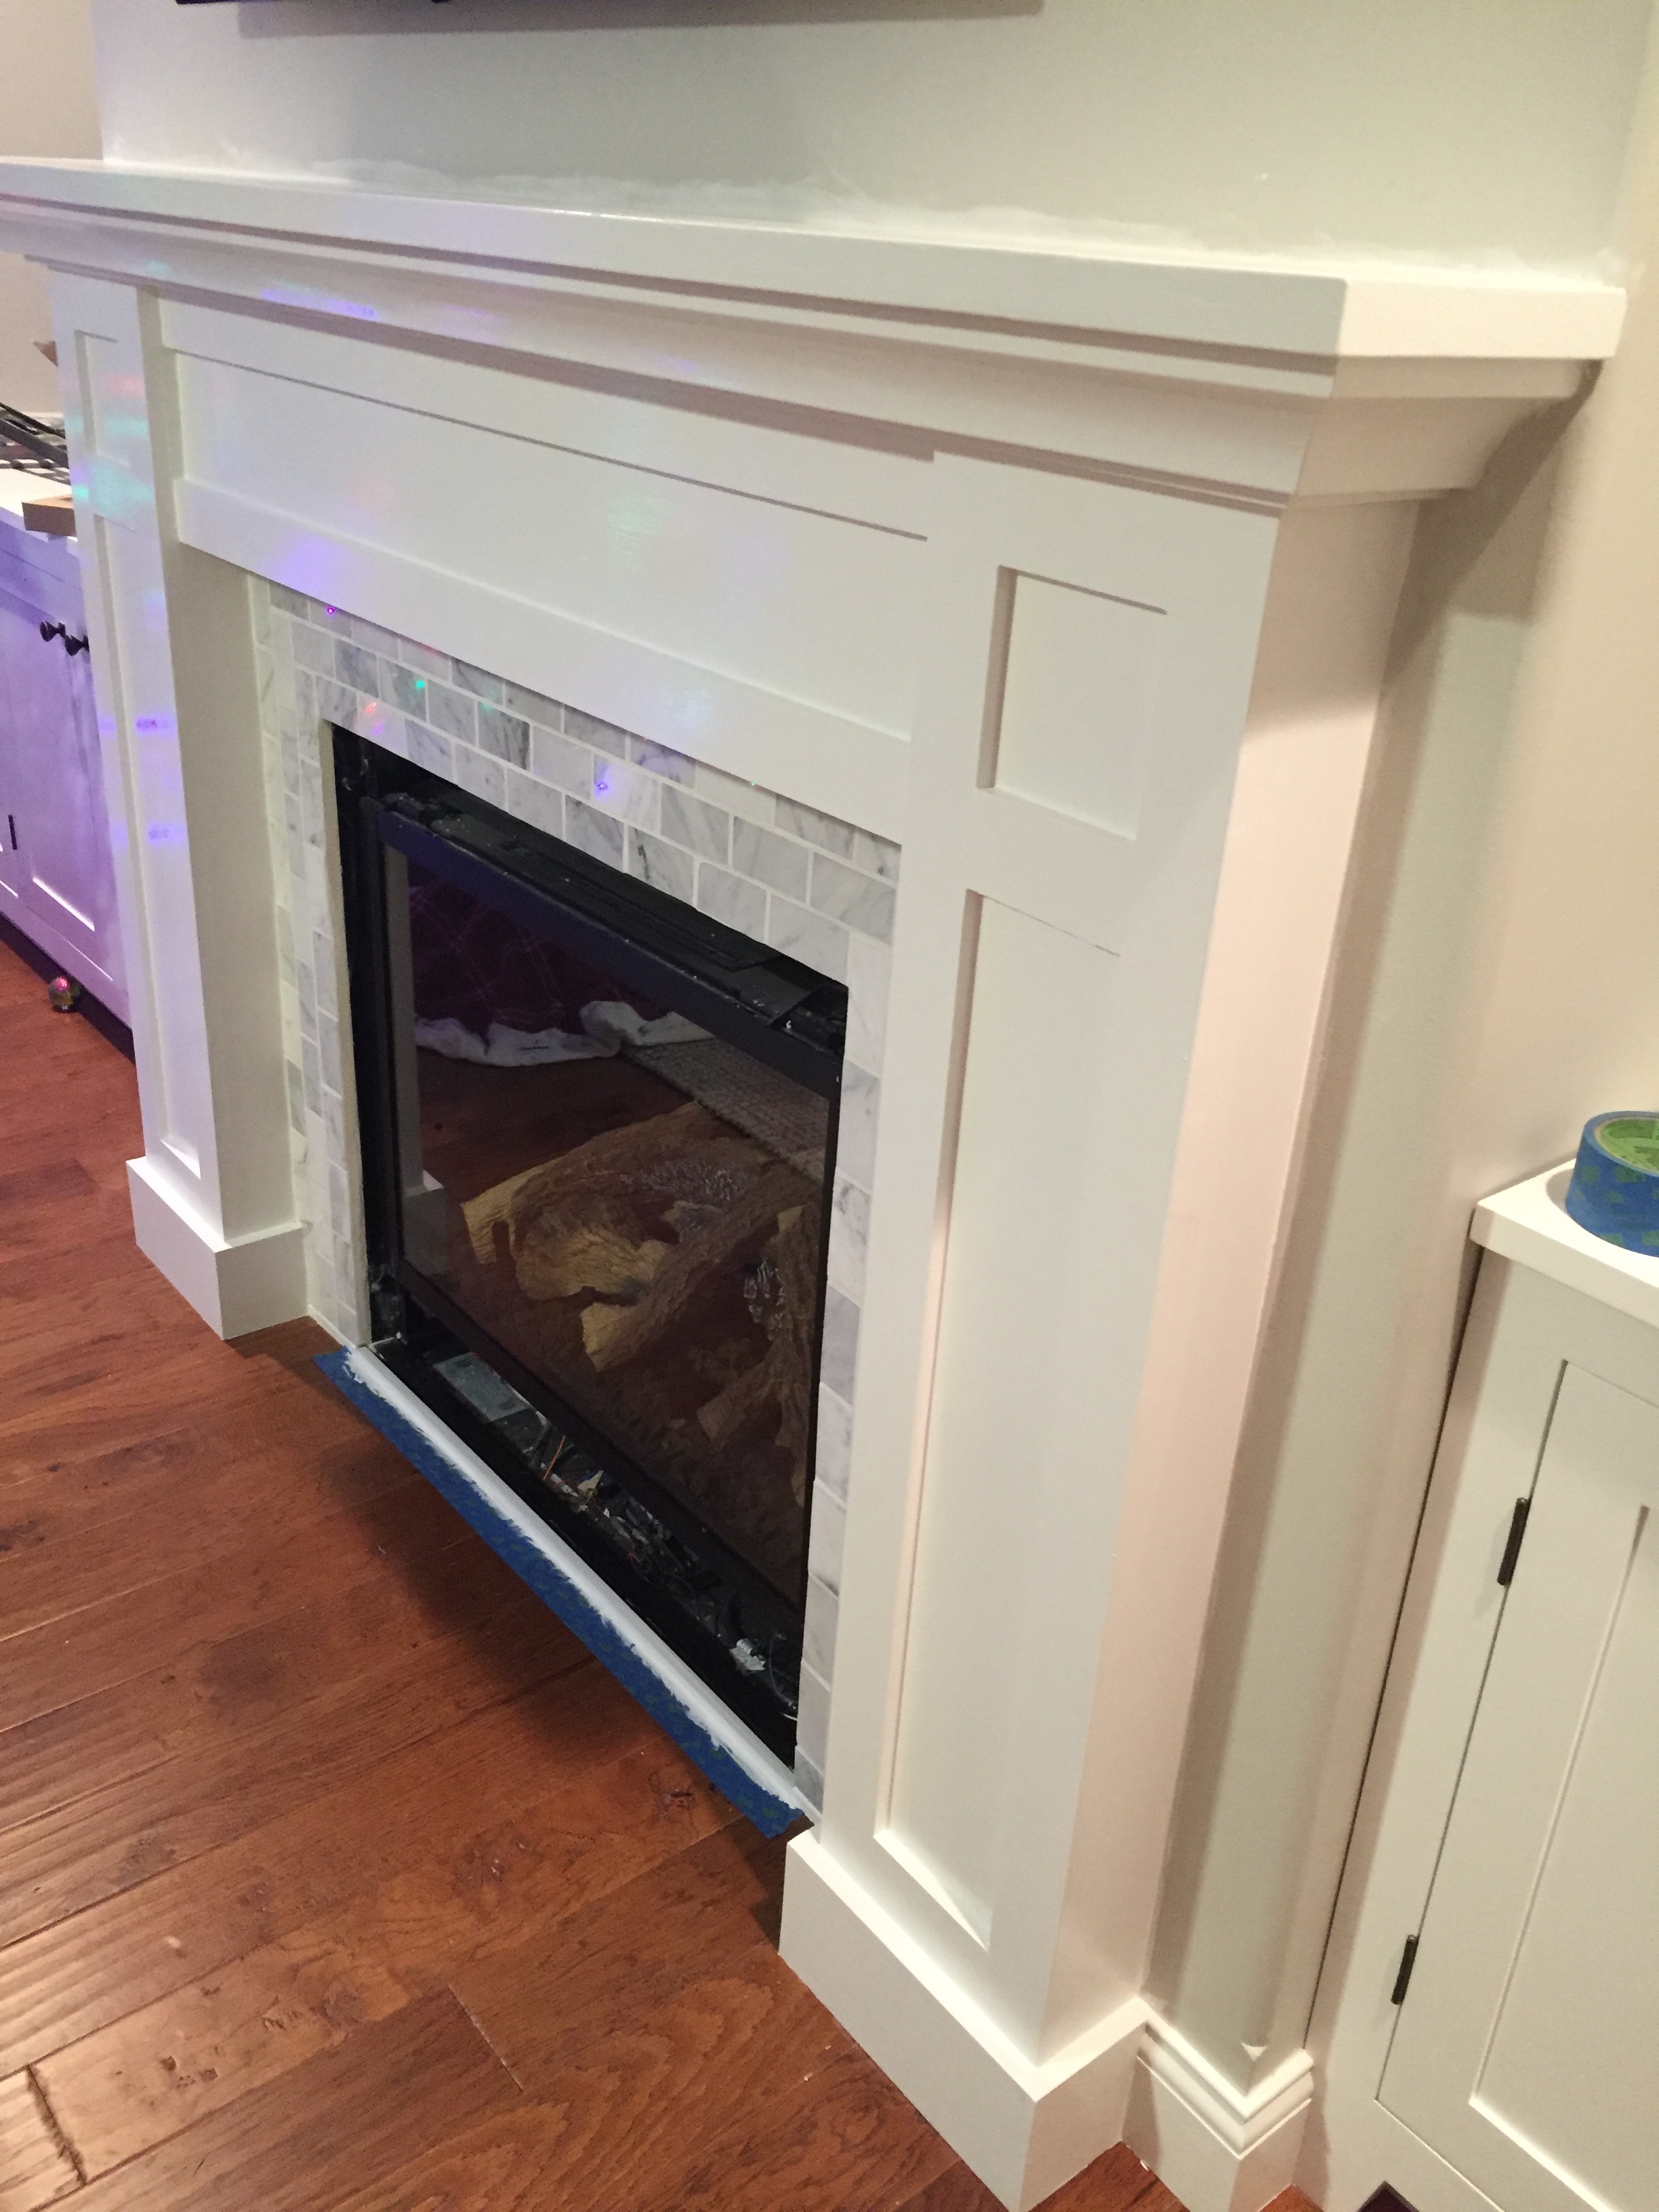
How to Build a Shaker Fireplace Mantel and Surround
Easy Fireplace Mantel DIY
Related Posts:
- Rustic Fireplace Surround Ideas
- Vintage Wood Fireplace Surround
- Farmhouse Fireplace Surround
- Pine Fireplace Surround
- Gas Fireplace Surround Ideas
- Fireplace Surrounds Design Ideas
- Fireplace Surround Ideas
- DIY Stainless Steel Fireplace Surround
- Modern Concrete Fireplace Surrounds
- Fibreglass Fireplace Surround
Mastering the Art of Creating Fireplace Surround Plans
Creating a stunning fireplace surround can transform an ordinary fireplace into a captivating centerpiece in your home. With diligent planning and attention to detail, you can build a fireplace surround that not only adds warmth but also enhances the aesthetic appeal of your living space. In this article, we will guide you through the step-by-step process of creating fireplace surround plans, providing detailed instructions and addressing frequently asked questions to ensure your project’s success.
Understanding the Basics: Designing Your Fireplace Surround
Assessing Your Space:
Before commencing the planning phase, carefully evaluate the available space where you intend to install the fireplace surround. Take measurements of the height, width, and depth of your fireplace to determine suitable dimensions for each component of the surround.
Choosing Materials:
Consider various materials for your fireplace surround, such as stone, tile, or wood, based on your preferred style and budget. Each material presents unique advantages and aesthetics, so take your time to research and select one that complements your overall interior design.
Deciding on Style:
Determine the desired style of your fireplace surround to ensure it harmonizes with the rest of your decor. Whether you lean towards a traditional, rustic, or contemporary look, envision how each element will come together cohesively.
Can I build a fireplace surround around any type of fireplace?
Yes, with proper planning and adherence to local building codes, you can create a beautiful surround for almost any type of fireplace – be it masonry or prefabricated.
How do I choose between natural stone and manufactured stone for my surround?
Natural stone offers unparalleled beauty and durability but can be more expensive. Manufactured stone provides a similar aesthetic while offering easier installation and potentially lower costs.
Creating Fireplace Surround Plans: Step-by-Step Guide
Sketching Your Design:
Begin by sketching your fireplace surround design on graph paper or using a design software tool. This visual representation will aid you in understanding the layout and proportion of each component.
Measuring and Calculating:
Referencing your initial measurements, calculate the required dimensions for the hearth, mantel, legs, and headers that will constitute your surround. Ensure they are proportionate and suit the overall style you envision.
Obtaining Materials:
Once you have finalized your design and dimensions, create a comprehensive materials list to ensure you have everything needed for construction. Don’t forget to account for additional items like adhesive, grout, or sealant.
Preparing the Area:
Before installation, remove any existing finishings around the fireplace area and ensure it is clean and free from debris. Consider covering surrounding surfaces with protective materials to prevent damage during construction.
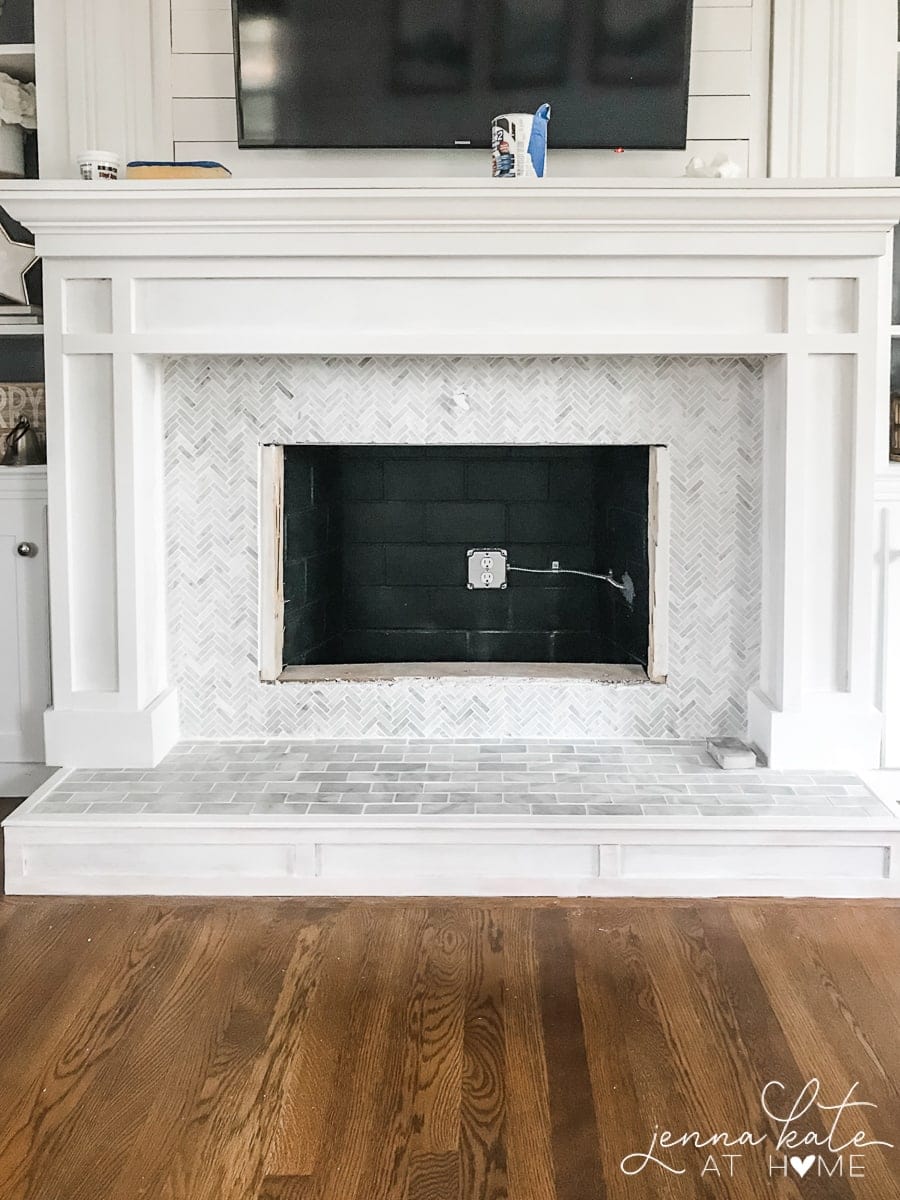
Constructing the Hearth:
The hearth serves as the foundation of your fireplace surround, both functionally and aesthetically. Follow your plans precisely to build a sturdy and level base using suitable materials such as concrete or tile.
Can I install a hardwood floor directly against my hearth?
To protect your hardwood floor from potential heat damage, leave a small gap between the hearth edge and flooring to allow for expansion and contraction.
Is it necessary to hire a professional installer to construct the hearth?
While some DIY enthusiasts may feel confident tackling this task themselves, hiring a professional if you lack experience is advisable – especially when it comes to working with materials like concrete or
Follow your plans to construct the mantel, ensuring it aligns with the style and dimensions specified. Take into consideration any additional features you want to incorporate, such as shelves or decorative accents.
Here are the steps you can follow to construct the mantel:
Gather materials and tools: Collect all the necessary materials required for building the mantel, such as lumber, plywood, screws or nails, wood glue, sandpaper, paint or stain, and any additional features like shelves or decorative accents. Also, gather the tools needed, including a saw (circular saw or miter saw), drill or screwdriver, measuring tape, level, sander or sandpaper, and paintbrushes.
Measure and plan: Take accurate measurements of the fireplace area where the mantel will be installed. Use these measurements to create a detailed plan for your mantel design, specifying dimensions and style preferences.
Build the frame: Cut pieces of lumber according to your plan’s dimensions for the horizontal top piece (shelf) and vertical side pieces (legs) of the mantel. Assemble them into a rectangular frame using wood glue and screws or nails. Ensure that the frame is sturdy and level.
Install support brackets: If your mantel design includes shelves or additional features like heavy decorative accents, install support brackets within the frame to provide extra stability. Use screws or nails to secure these brackets securely in place.
Attach plywood backing: Cut a piece of plywood according to the size of the back of your frame. Attach it securely using screws or nails to reinforce the structure of the mantel.
Sand and finish: Use sandpaper or a sander to smooth out any rough edges or surfaces on your mantel. Pay extra attention to areas where boards meet to ensure a seamless finish. Once sanded, apply paint or stain according to your desired finish. Let it dry completely before proceeding.
Install additional features (optional): If you want to incorporate shelves into your mantel design, measure and cut pieces of lumber accordingly. Attach them securely within the frame using wood glue and screws or nails. Similarly, if you plan to add decorative accents like trim or molding, measure and cut those pieces and attach them as desired.
Mount the mantel: Position the completed mantel frame against the wall, ensuring it aligns properly with the fireplace and any surrounding features. Use a level to ensure it is perfectly straight. Secure it to the wall studs using screws or nails, making sure it is firmly attached.
Final touches: Once the mantel is securely mounted, inspect it for any touch-ups or adjustments needed. Fill any visible nail or screw holes with wood filler and sand them smooth after drying.
Decorate and style: After completing all construction and finishing steps, decorate your mantel with your chosen accessories and style it to complement your overall room decor.
Following these steps will help you construct a mantel that aligns with your plans and desired style while incorporating any additional features you want to include.
Installing Headers:
Installing headers is an important step in many construction or renovation projects. Headers are horizontal beams that support the weight of the structure above an opening, such as a door or window. They distribute the load and prevent sagging or collapsing of the surrounding walls.
To install headers, follow these steps:
1. Measure the width of the opening where you will be installing the header. Add a few extra inches to allow for adjustments and ensure a proper fit.
2. Choose a suitable material for your header, such as pressure-treated lumber, engineered wood, or steel beams. The material should be strong and able to support the weight of the structure.
3. Cut the header to the desired length using a saw. Make sure to measure accurately and cut straight to achieve a precise fit.
4. If necessary, remove any existing framing or studs from above the opening to create space for the header.
5. Position the header on top of the opening, ensuring it is level and centered. Use a level and shims if needed to make adjustments.
6. Securely attach the header by nailing or screwing it into place. Use appropriate fasteners, such as structural screws or nails long enough to penetrate adjacent framing members.
7. Reinforce the connection between the header and adjacent framing by adding metal brackets or straps for additional strength and stability.
8. Check that the header is still level and securely in place before proceeding with further construction or installation work.
Remember, if you’re not experienced with carpentry or construction work, it’s always a good idea to consult with a professional for guidance and assistance. Safety is paramount when working with heavy materials and structural elements like headers.