Shiplap over a brick fireplace is a popular design trend that can transform the look and feel of a room, creating a charming and cozy atmosphere. Before proceeding with this project, it’s essential to evaluate the condition of the existing brick surface. The brick should be clean, free from any loose mortar, and adequately prepared to ensure proper adherence of the shiplap material. Begin by thoroughly cleaning the brick surface and, if necessary, repairing any damaged areas. This preparation is critical for the longevity and stability of the shiplap installation. Once the brick is ready, a moisture barrier or vapor barrier may be recommended to prevent potential issues with moisture seeping through the brick and affecting the shiplap.
Images about Shiplap Over Brick Fireplace
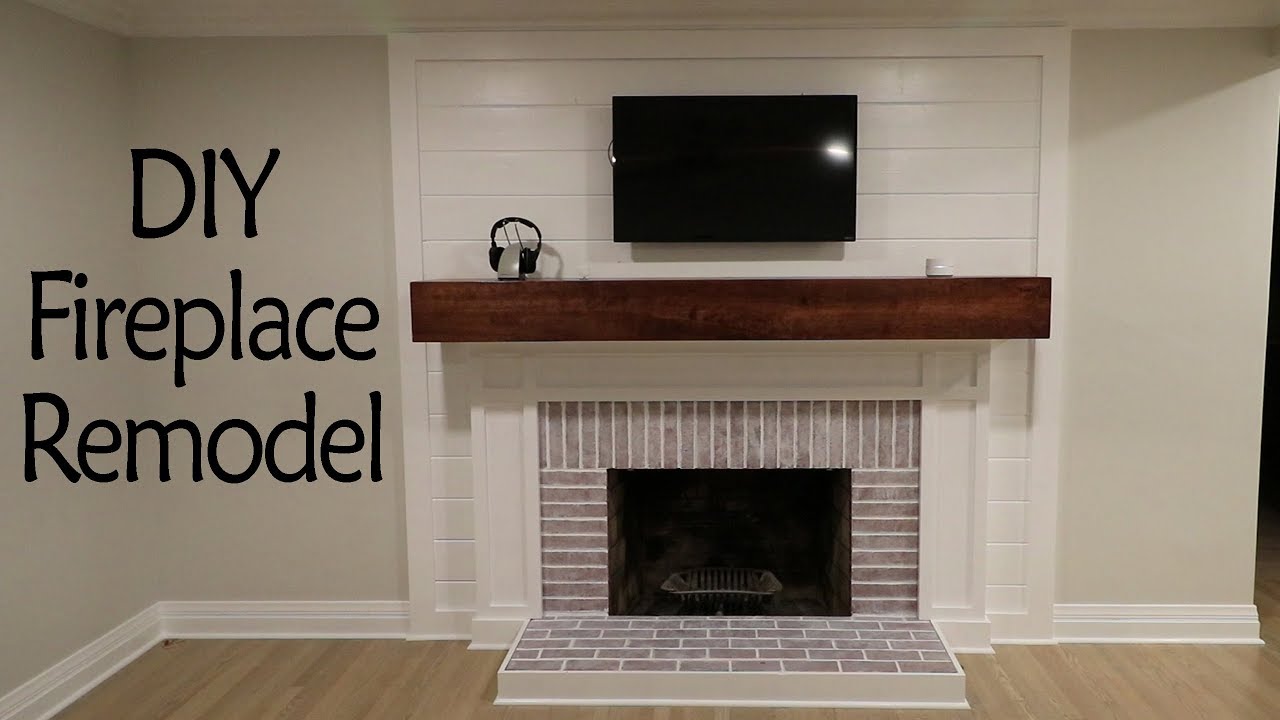
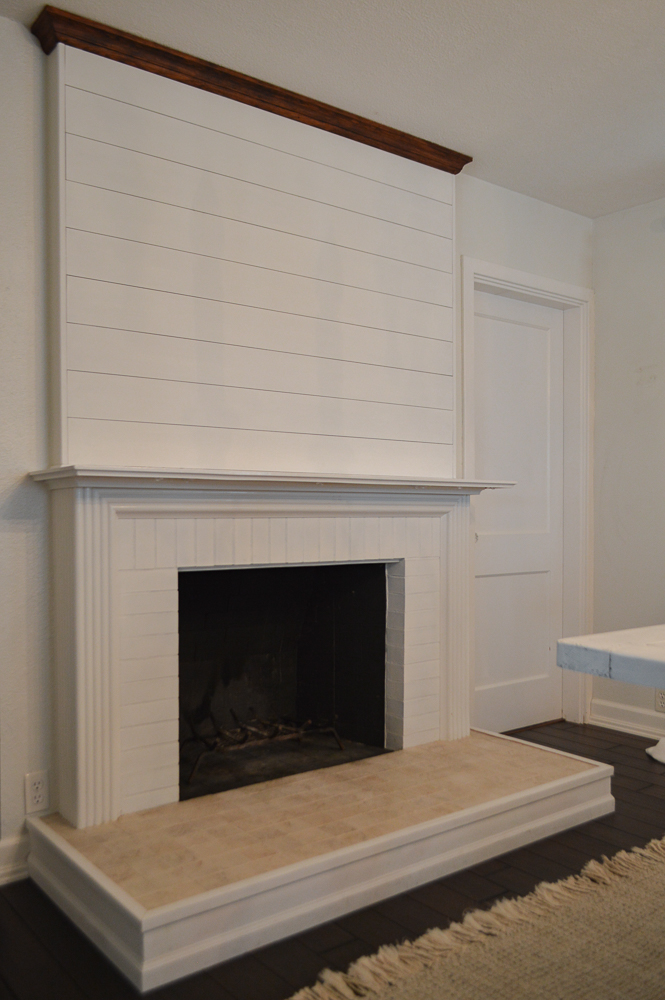
Shiplap Over Brick Fireplace

Choosing the right type of shiplap material is another key consideration when covering a brick fireplace. Opt for a material that complements the overall aesthetic of the space while also being suitable for the high-temperature environment around the fireplace. Common materials include real wood, engineered wood, or MDF (medium-density fiberboard). Real wood shiplap provides a rustic and authentic look, but it may require more maintenance. Engineered wood and MDF options offer a more budget-friendly alternative with lower maintenance requirements, but they may lack the natural warmth and texture of real wood. The choice depends on personal preference, budget constraints, and the desired aesthetic outcome.
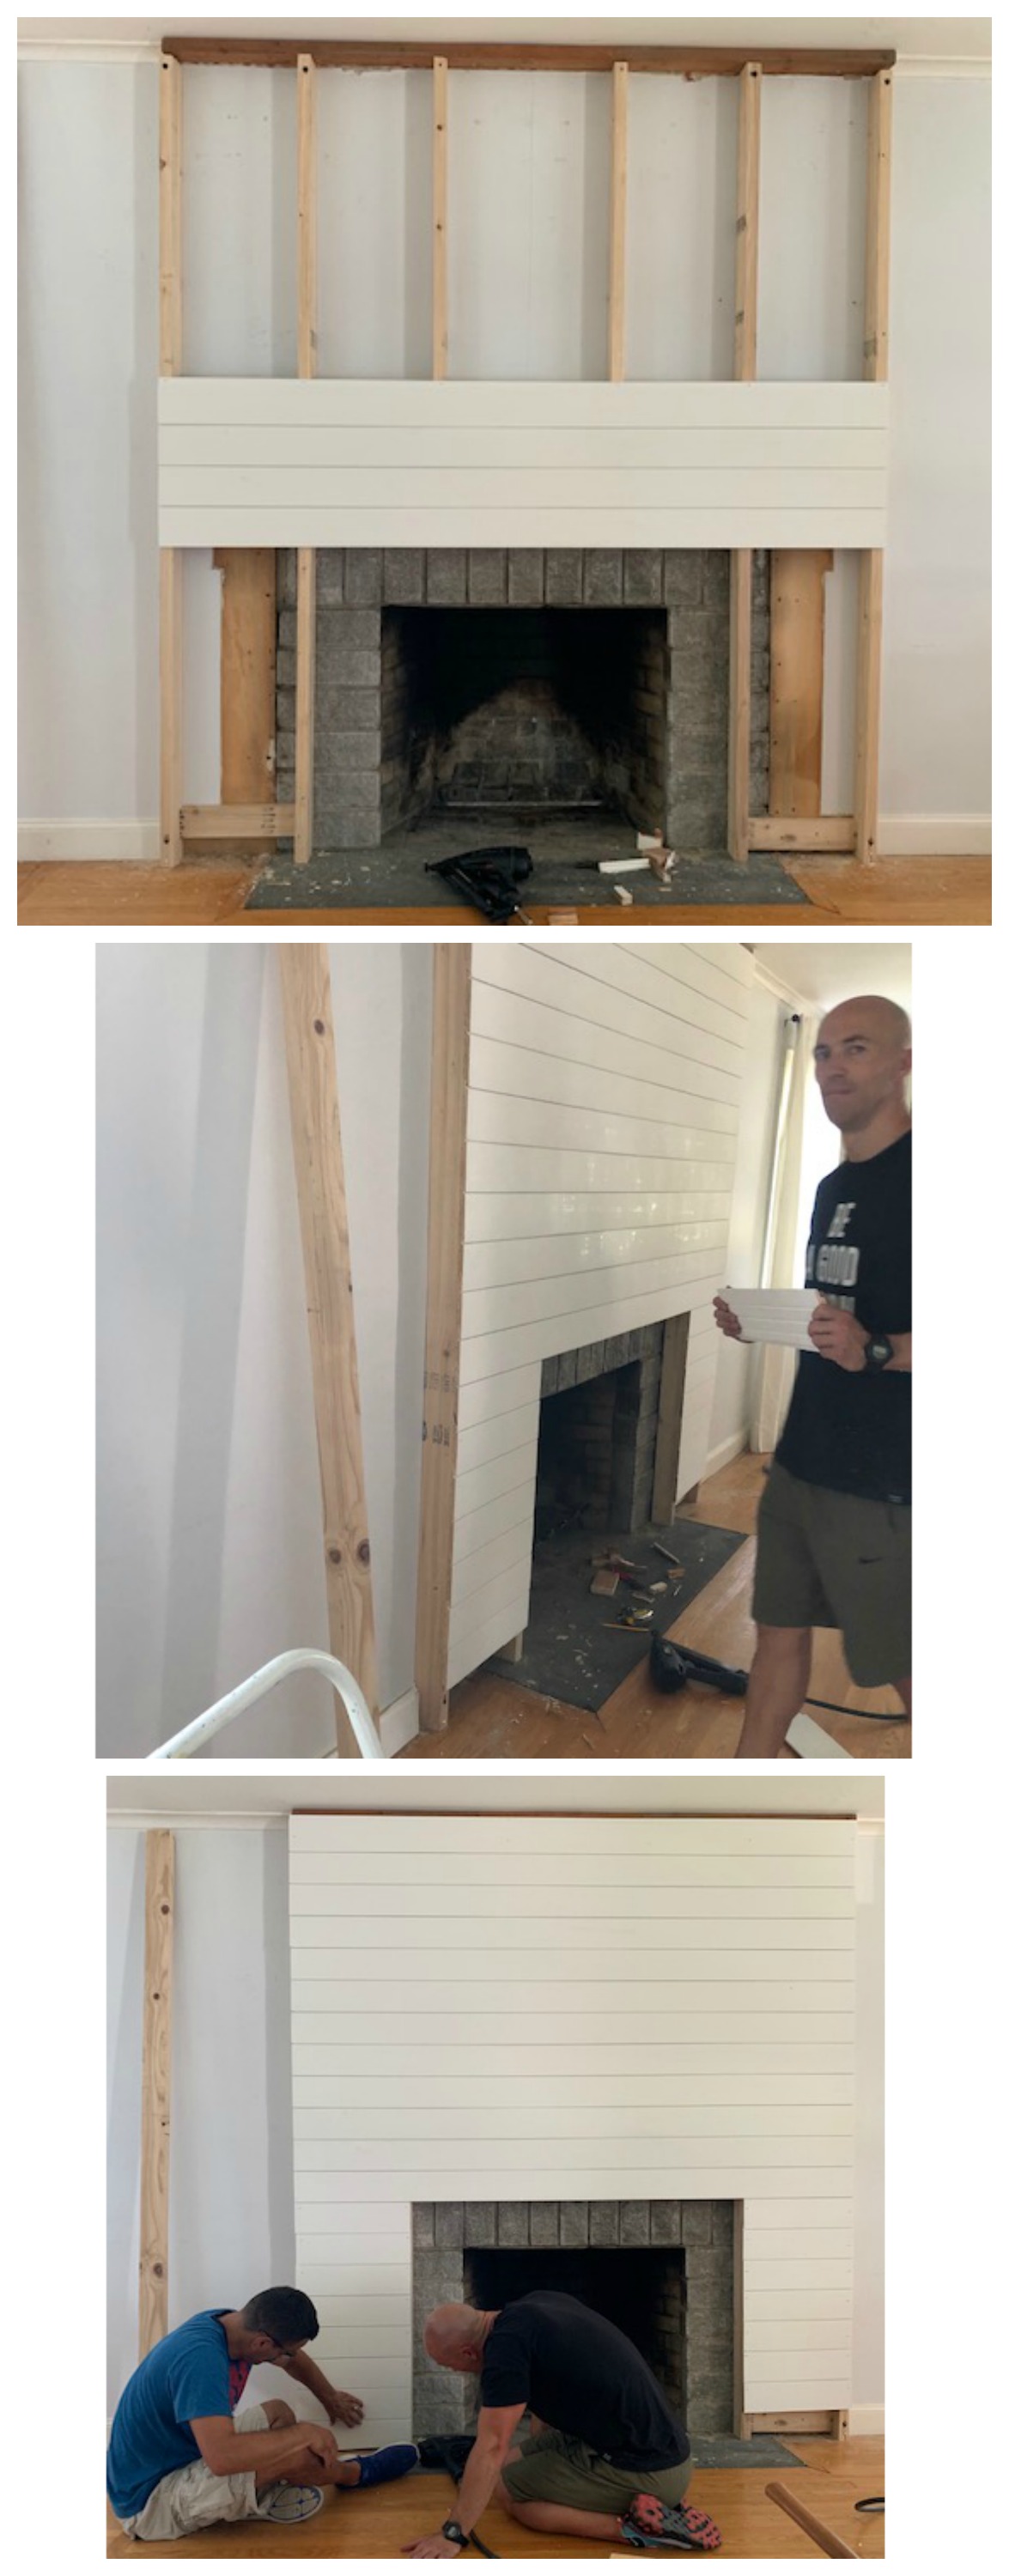
Proper installation techniques are crucial for a successful shiplap over brick fireplace project. Begin by attaching furring strips or a plywood substrate directly to the brick surface, creating a flat and even base for the shiplap. This step not only improves the stability of the installation but also provides an opportunity to add insulation if needed. Once the substrate is in place, shiplap boards can be attached horizontally or vertically, depending on the preferred design. Consider the layout and spacing of the shiplap boards to achieve a balanced and visually appealing result. Some homeowners choose to paint or stain the shiplap for a customized finish, while others prefer to maintain the natural wood tones for a timeless and classic look.

Beyond the aesthetic advantages, covering a brick fireplace with shiplap offers practical benefits. The added layer of insulation can improve energy efficiency by preventing heat loss through the brick. Additionally, shiplap provides a versatile backdrop for decorating the fireplace with mantels, artwork, or other design elements. Homeowners should be mindful of the overall dimensions of the room and the proportions of the fireplace to ensure that the shiplap complements the space harmoniously. With careful planning, attention to detail, and the right materials, shiplap over a brick fireplace can be a rewarding and transformative DIY project that enhances the visual appeal of any room.

Shiplap Fireplace and DIY Mantle – Ditched the Old Traditional
How to Build a DIY Brick Fireplace Hearth with a Shiplap Accent

Can I shiplap over brick?

How To Install Shiplap Above A Fireplace – Fox Hollow Cottage
DIY Shiplap Fireplace

Gorgeous Shiplap Fireplace Ideas

Related Posts:
- Vintage Brick Fireplace
- Farmhouse Brick Fireplace
- Repaint Brick Fireplace
- How To Clean Brick Fireplace
- Small Brick Fireplace
- Remodel Brick Fireplace With Stone
- Red Brick Outdoor Fireplace
- How To Clean Mold Off Brick Fireplace
- Painted Gray Brick Fireplace
- Paint Wash Brick Fireplace
Shiplap Over Brick Fireplace: A Modern and Stylish Upgrade for Your Home
The fireplace is often considered the heart of a home, providing warmth, coziness, and a focal point for gatherings. However, if you have a brick fireplace that looks outdated or doesn’t match your desired aesthetic, you may be searching for ways to transform it into something more modern and stylish. One popular solution is shiplap over brick fireplace, which can completely revamp the look of your living space. Let’s see the process of installing shiplap over a brick fireplace, along with frequently asked questions to help you make an informed decision.
Understanding Shiplap:
Before diving into the details of shiplap installation, let’s briefly discuss what shiplap actually is. Shiplap is a type of wooden board commonly used in interior design to create a rustic or farmhouse-style look. It consists of overlapping grooved boards that fit together snugly with a slight gap between each piece. The term “shiplap” originated from its use in shipbuilding, where the boards were designed to interlock and create a watertight seal.
Benefits of Using Shiplap Over Brick Fireplace:
Enhanced Aesthetics:
One of the main advantages of using shiplap over a brick fireplace is the instant transformation it brings to your living space. Shiplap lends a clean and sleek appearance that can significantly modernize any outdated brickwork. The smooth horizontal lines created by shiplap boards add visual interest and texture to an otherwise plain surface.
Versatility:
Another benefit of shiplap is its versatility. Whether you prefer a traditional or contemporary style, shiplap can easily adapt to various design themes. It can be painted in any color you desire or left in its natural wood finish to create a warm and inviting atmosphere.
Easy Installation:
Installing shiplap over a brick fireplace is a relatively simple process that can be accomplished by most homeowners with basic DIY skills. With the right tools and techniques, you can achieve professional-looking results without the need for extensive construction work or hiring a contractor.
Step-by-Step Guide to Installing Shiplap Over Brick Fireplace:
Now that we understand the benefits of using shiplap, let’s delve into the step-by-step process of installing it over a brick fireplace.
Step 1: Prepare the Surface:
To ensure proper adhesion of the shiplap boards, it is crucial to prepare the brick surface beforehand. Start by thoroughly cleaning the bricks and removing any loose mortar or debris. Use a wire brush and vacuum cleaner to eliminate dust and dirt from between the bricks. If the surface is uneven or damaged, consider repairing it with a suitable patching compound and sanding it smooth.
Step 2: Measure and Cut Shiplap Boards:
Measure the height and width of your fireplace to determine the amount of shiplap you will need. It is advisable to purchase extra boards to account for any mistakes or future replacements. Using a miter saw or table saw, cut the shiplap boards to fit the dimensions of your fireplace, allowing for an appropriate gap between each board.
Step 3: Install Furring Strips:
Before attaching the shiplap, create a level surface by installing furring strips vertically over the brick fireplace using construction adhesive and masonry screws. The furring
Strips will serve as a secure base for the shiplap boards and help to create a consistent and even installation.
Strips are thin, narrow pieces of wood or metal that are used as a foundation or support for the installation of other materials, such as shiplap boards. When installing shiplap, it is important to have a secure base to ensure that the boards are properly aligned and evenly spaced.
By using strips as a base, you can create a consistent and level surface for the shiplap boards to be attached to. This helps to eliminate any unevenness or gaps between the boards, resulting in a more professional and polished finish.
Additionally, the use of strips adds an extra layer of security to the installation. The strips provide additional stability and strength to the shiplap boards, reducing the risk of them warping or shifting over time.
Overall, using strips as a secure base for shiplap installation is a recommended practice that helps to ensure a consistent and even final result.
Step 4: Attach Shiplap Boards:
After preparing the wall surface, it’s time to attach the shiplap boards. Follow these steps:
- Start by measuring the length of the wall and cut the first shiplap board accordingly. Leave a small gap on each end to allow for expansion.
- Apply construction adhesive to the back of the board, then place it on the wall, starting from one corner. Use a level to ensure it’s straight.
- Secure the board in place by nailing it to the studs behind the drywall. Use a pneumatic nail gun or a hammer and finish nails.
- Repeat the process for the remaining boards, making sure to leave consistent gaps between each board for an even look. Cut boards as needed to fit around windows, doors, or outlets.
- Remember to stagger the joints of each row, so they don’t line up vertically. This adds strength and visual interest.
- Continue attaching boards until you reach the opposite end of the wall or desired height.
- For corners or edges, use corner trim or baseboards to create a clean finish.
- Once all boards are attached, fill any nail holes or gaps with wood filler and sand them smooth.
- Finally, you can choose to paint or stain the shiplap boards according to your preference.
- Stand back and admire your newly installed shiplap wall!