After exploring many choices, I opted to transform my plain brick fireplace into a magnificent focal point using mosaic tile. The project seems difficult at first, but I realized that with careful design, high-quality materials, and patience, most homeowners can create a stunning mosaic tile fireplace. Through my own installation experience and assisting several friends with theirs, I’ve learnt the critical approaches, common errors, and professional tricks that differentiate amateur and expert results. This guide explains everything I wish I’d known before beginning my first mosaic fireplace project.
Plan Your Mosaic Design and Layout
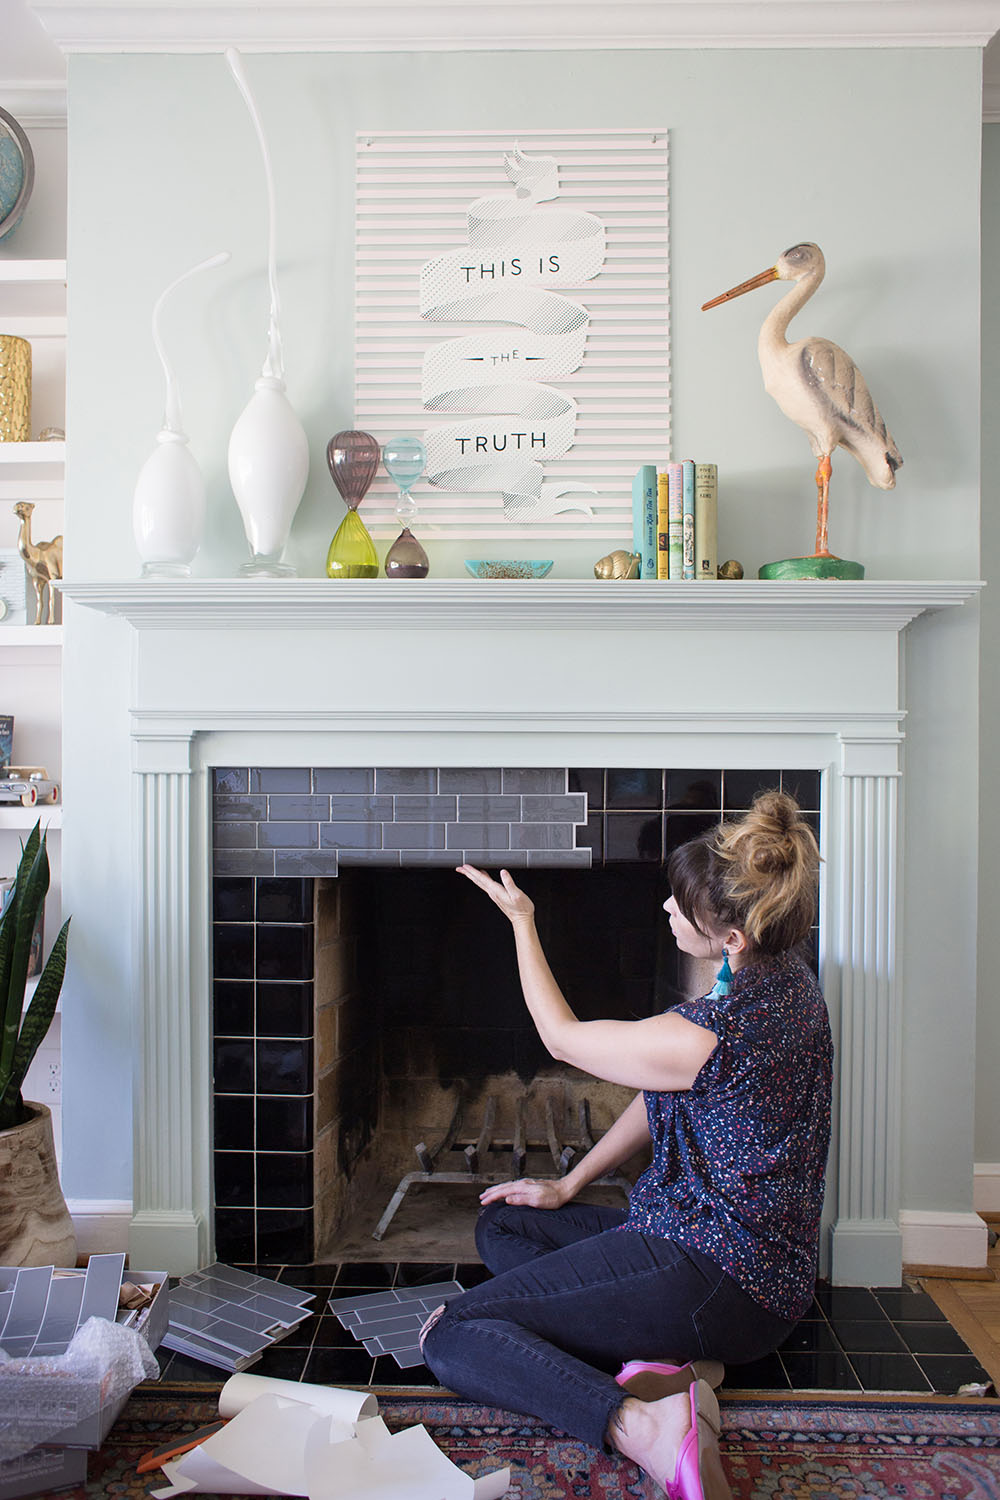
Understanding your space and existing decor is the first step in creating a good mosaic design. I spend a lot of time designing alternative patterns and color combinations, thinking about how the fireplace would look from different angles around the room. The scale of the mosaic pieces should correspond to the size of the fireplace, with smaller tiles working well for delicate designs and larger pieces making bold, modern statements. I usually develop a thorough plan of tile placement to avoid costly mistakes during installation.
Color selection has a significant impact on the end product and should compliment your current furniture and architectural aspects throughout the area. I prefer to make a sample board with actual tiles to evaluate how colors interact under various lighting circumstances, ranging from natural daylight to dusk artificial light. Neutral base colors with strategic accent items allow for future decorating modifications, whereas aggressive color choices provide eye-catching focal points that anchor the room’s overall design. The grout color has a great impact on the overall appearance, whether it blends tiles flawlessly or creates contrast that highlights particular pieces.
Pattern selections range from simple subway patterns to intricate geometric designs, with varying skill levels and installation time requirements. I recommend that you start with simple patterns like running bond or herringbone before trying complicated mosaics with curved lines or complex designs. The pattern should accentuate rather than overpower the fireplace dimensions, with bolder patterns working best on larger surfaces and complex designs better suited to smaller installations. Testing the arrangement with loose tiles identifies potential flaws before permanent installation, saving time and materials while ensuring professional results.
Choosing Materials and Tools
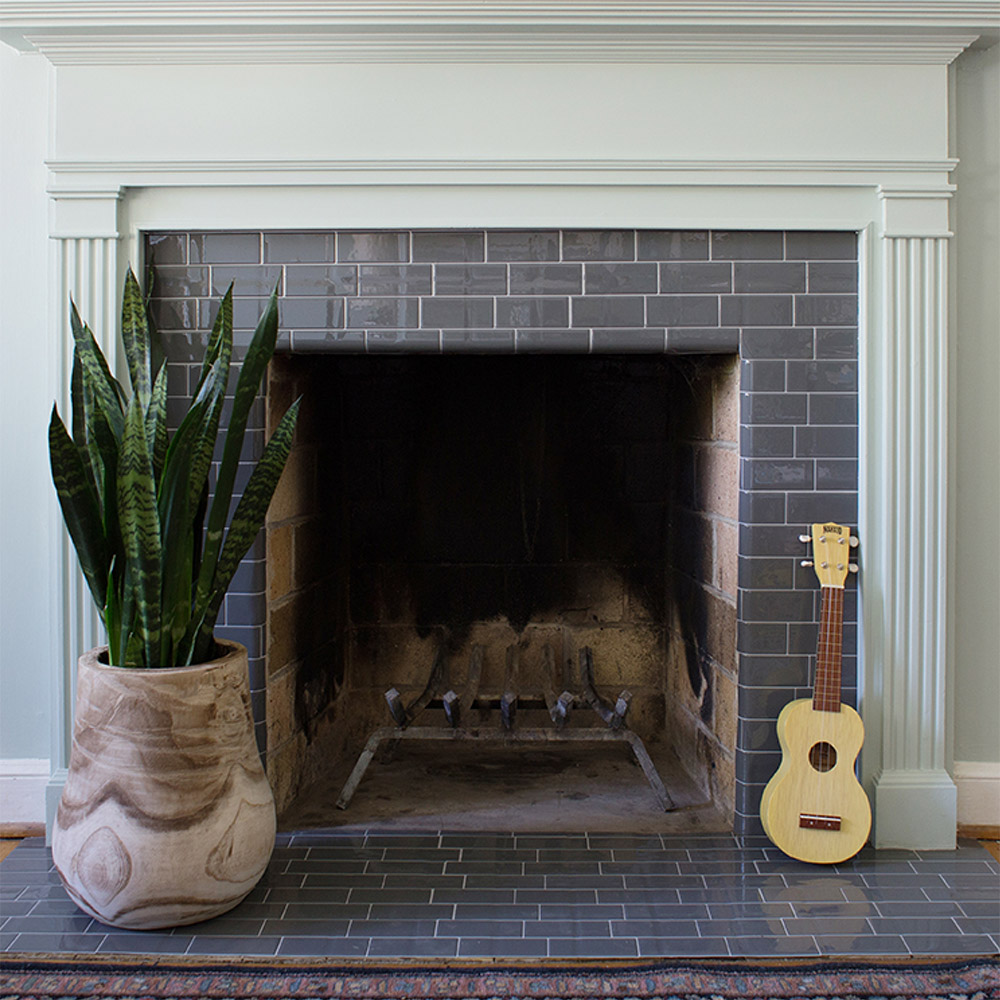
Quality mosaic tiles vary greatly in durability, heat resistance, and appearance, necessitating careful selection for fireplace applications that require performance. I always use high-temperature-rated tiles, which are often ceramic, porcelain, or natural stone that will not shatter or discolor from heat exposure. Glass tiles produce stunning results, but they require special adhesives and cautious installation to avoid thermal stress. The tile thickness influences both appearance and installation complexity, with thinner tiles requiring completely flat surfaces and thicker choices accommodating small substrate flaws.
Adhesive choices influences the endurance and safety of your mosaic installation, especially in high-heat areas near operating fireplaces. I only use heat-resistant tile adhesives created expressly for fireplace applications, rather than normal construction adhesives, which may break under thermal stress. Premixed adhesives are convenient, but powder versions often have stronger bonding and higher heat resistance. The working time varies between products, limiting how much space I can cover before the glue begins to cure, influencing my installation pace and strategy.
Tile nippers, wet saws, notched trowels, and other hand tools are necessary for mosaic installation to achieve professional results and move the process forward efficiently. I invest in high-quality tile nippers that produce clean, chip-free cuts, because broken tiles can destroy carefully designed patterns. A wet tile saw can make straight cuts fast and safely, although manual tools are preferable for fine trimming and fitting. Spacers keep the spacing between tiles uniform, although mosaic installations frequently require many sizes to accommodate uneven forms and specific patterns that define the overall design appeal.

Surface Prep and Substrate Requirements
Proper surface preparation is the cornerstone of effective mosaic tile installation, preventing subsequent failures that may necessitate total removal and reinstallation. I meticulously clean the existing surfaces, eliminating any dirt, grease, paint, or loose debris that could interfere with adhesive bonding. To achieve level, even substrates, rough materials such as brick need to be smoothed with patching compound or backer board. Any structural concerns, fissures, or movement problems must be addressed prior to tile installation, since they will telegraph through thin mosaic materials and cause early collapse.
Heat-resistant backer boards are ideal substrates for fireplace mosaic installations due to their dimensional stability and outstanding adhesive bonding properties. I prefer cement-based solutions specifically intended for high-temperature applications over typical drywall or plywood substrates, which may fail under heat stress. To achieve seamless, stable surfaces, adequate fastening and joint treatment are required when installing backer board. Moisture barriers are especially necessary in regions where cleaning water may permeate; nevertheless, effective installation procedures considerably reduce water penetration concerns.
Priming prepared surfaces enables optimal adhesive bonding and avoids substrate materials from absorbing moisture from tile adhesives before curing occurs. I utilize primers created expressly for tile installations rather than regular wall primers, which may not give appropriate bonding properties. The primer application must be even and complete, with special attention given to corners and edges where adhesive bonds are most stressed. Allowing adequate drying time prior to tile installation eliminates bonding problems that may not become apparent until months later, when repairs are much more difficult and expensive.
Installation Techniques and Best Practices
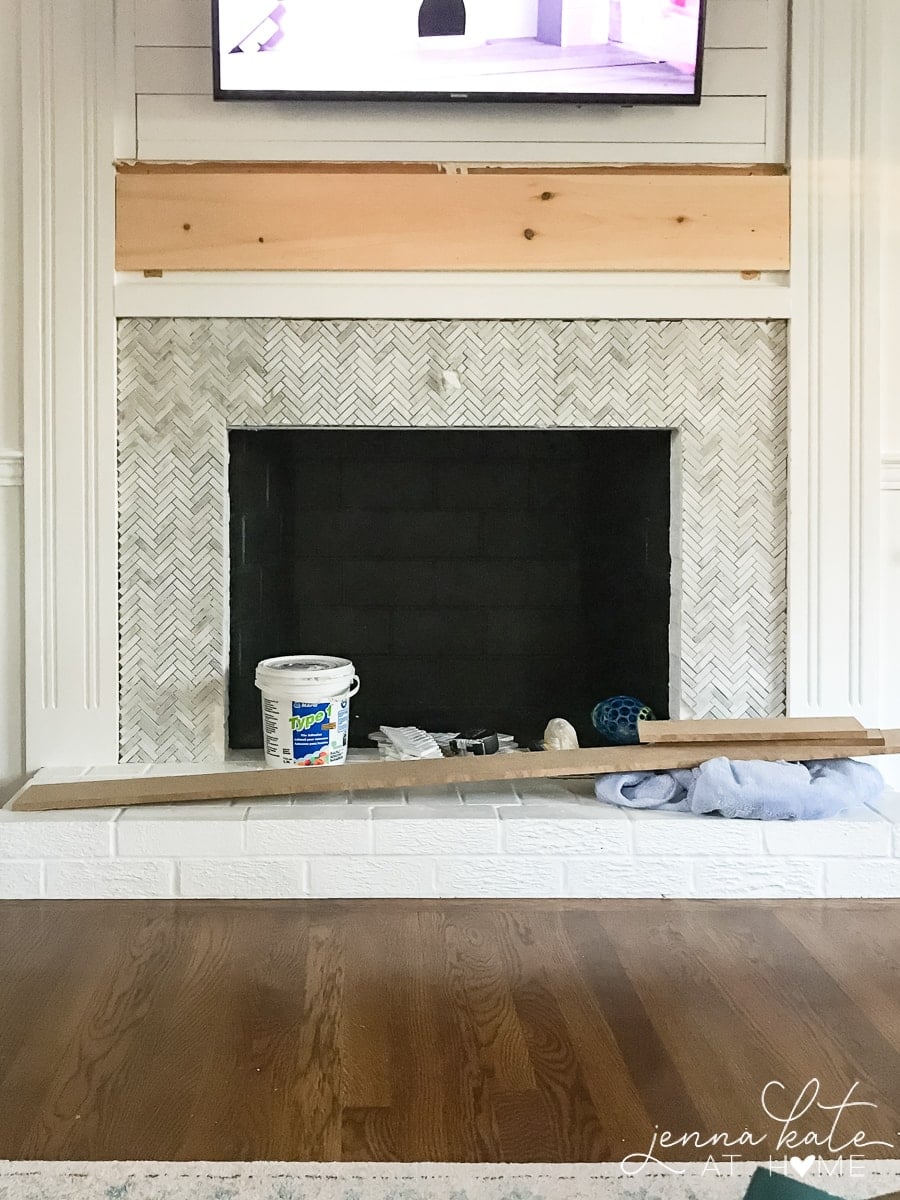
Starting the installation from the center enables balanced tile placement and avoids uncomfortable cuts in conspicuous spots where they will be instantly evident. I use chalk lines as reference points and proceed outward gradually, ensuring uniform spacing and alignment throughout the installation procedure. Proper trowel techniques are required for glue application to ensure enough coverage without excess that may squeeze through joints and cause cleanup issues. Working in reasonable pieces keeps the adhesive from peeling over before the tiles are thoroughly bedded and adjusted for correct alignment.
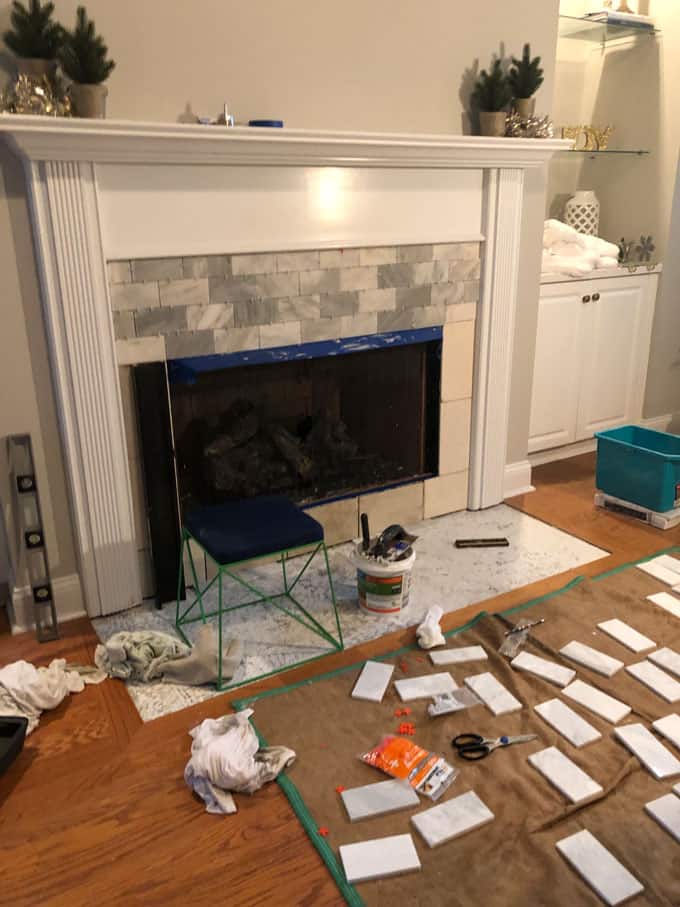
Cutting mosaic tiles requires patience and precise procedures to obtain clean edges without chipping or cracking, which could jeopardize the beauty and installation integrity. I score tiles deeply with sharp tools before snapping to ensure smooth splits along the correct lines. Complex curves necessitate nibbling little bits progressively rather than attempting massive cuts, which frequently result in breakage and wasted materials. Wet cutting offers the cleanest results, but also necessitates suitable safety equipment and dust control measures to protect both health and the surrounding environment from pollution.
Professional-looking installations are distinguished by consistent spacing and alignment, as opposed to obvious amateur attempts that highlight defects rather than overall beauty. To detect problems before they spread to bigger regions, I utilize spacers on a regular basis and check alignment with straight edges and levels. The grout lines should be uniform in width and direction, with any purposeful variances following predetermined patterns rather than appearing random or accidental. Taking the time to guarantee perfect alignment during installation saves money on repairs and ensures that the project is done to your satisfaction for years to come.

Grouting and Finishing Details
Grout selection impacts both appearance and maintenance requirements, so careful consideration is required for long-term satisfaction with the finished mosaic installation. Epoxy grouts are my preferred choice for fireplace applications because of their greater stain resistance and durability under temperature cycling, which occurs around active fireplaces. The grout color should compliment the tile selection rather than compete for attention, with neutral colors offering timeless appeal and aggressive colors producing dramatic contrast effects. Sanded grouts are excellent for joints wider than 1/8 inch, whereas unsanded variants are better for narrower joints found in mosaic installations.
Proper grouting method provides complete joint filling and avoids future maintenance issues that may jeopardize both appearance and performance over time. I remove excess glue from joints before grouting to ensure that the surfaces are clean for best grout adhesion and look. The grout should completely fill the joints, leaving no voids or air pockets that could allow moisture to penetrate or cause structural weakness. Working diagonally across tile surfaces avoids grout from being pulled from joints, resulting in smooth, consistent joint profiles across the installation area.
Cleaning leftover grout quickly eliminates haze formation and lowers the labor necessary for final polishing, which brings out the full beauty of mosaic installations. I use clean water and synthetic sponges, changing the water frequently to avoid spreading grout residue across tile surfaces. The initial cleaning removes bulk grout while joints are slightly recessed, followed by final polishing once joints have cured sufficiently to withstand sponge pressure. Proper curing time prior to final cleaning eliminates joint damage and promotes ideal grout strength and appearance for long-term beauty and functionality.
Maintenance and Long-term Care
Regular cleaning preserves the beauty and usefulness of mosaic tile fireplaces while preventing accumulation, which can cause irreversible staining or damage over time. During the active fireplace season, I clean my mosaic fireplace once a month with pH-neutral detergents formulated specifically for tile and stone. Harsh chemicals can harm tiles and grout, especially natural stone materials that respond negatively to acidic cleaners. A gentle brush removes soot and debris from textured surfaces without damaging delicate tile finishes or upsetting grout seams, which could allow moisture penetration.
Grout care requires regular attention to prevent degradation, which can affect the installation’s look and water resistance over time. I evaluate grout lines quarterly for cracks, discolouration, or missing parts that need to be repaired right away before the problem spreads to other areas. Grout sealing every two to three years helps to prevent discoloration and makes routine cleaning more efficient and less labor-intensive. Any damaged grout should be entirely removed and replaced rather than attempting surface repairs, which rarely result in long-term solutions or an acceptable appearance.
Seasonal inspections assist discover possible problems before they become major fixes that may necessitate partial or complete reinstallation of damaged portions. I look for loose tiles, fractured grout, and any indicators of movement that could suggest substrate issues that require professional inspection and repair. Heat cycling from the fireplace can induce expansion and contraction, gradually loosening tiles or opening grout joints over time. Addressing minor flaws quickly reduces water ingress, which can damage substrates and necessitate costly repairs to restore both function and appearance.

What sort of mosaic tile is most suited for fireplace applications?
Ceramic and porcelain tiles provide the finest heat resistance, durability, and design options for fireplace installations. I avoid using plastic or vinyl tiles because they can melt or produce hazardous fumes when heated. Natural stone works well, but it must be sealed to prevent soot stains. Glass tiles provide stunning visuals, but they require special heat-resistant adhesives and precise installation. To ensure safety and longevity in fireplace conditions, the tiles should be high-temperature resistant and suited for wall installations.
How much does a DIY mosaic tile fireplace project usually cost?
Material costs range from $5 to $20 per square foot, depending on tile type, with basic ceramic mosaics at the low end and quality natural stone or glass at the upper end. Tools and supplies typically add $100-300 to the project cost for most installations. Labor savings make DIY appealing, as professional installation can cost $15-30 per square foot. A typical fireplace surround covering 50 square feet may cost $400-1200 in materials versus $2000-4000 professionally constructed, making DIY an appealing alternative for frugal households.
Can mosaic tile be installed directly over existing brick or stone?
Yes, mosaic tile can be put over existing masonry surfaces with the right preparation and supplies. I thoroughly clean the surface and apply a primer intended for masonry substrates. Uneven surfaces may require smoothing with patching compound or backer board installation. The existing surface must be structurally sound, with no loose or cracked materials. Heat-resistant adhesives made specifically for masonry bonding assure excellent adherence. When completed effectively to surface preparation needs, this strategy saves money on demolition while producing outstanding results.
What is the most difficult part of DIY mosaic tile installation?
Achieving consistent spacing and alignment throughout the installation demands patience and attention to detail, which many DIYers underestimate at first. Cutting tiles to fit around obstacles and edges requires practice and the right tools to avoid chipping and waste. Planning the arrangement to prevent uncomfortable cuts in conspicuous spots necessitates skill and foresight. I propose that you practice cutting techniques on spare tiles before working on visible sections. Investing in thorough planning and preparation eliminates the majority of problems and provides professional-looking results that bring long-term enjoyment.
How should I manage angles and edges in mosaic tile installations?
Corner treatments must be carefully planned to ensure a clean, professional appearance with no visible cut edges or misaligned patterns. To achieve completed edges, I use trim pieces or bullnose tiles when they are available. When cutting ordinary tiles for corners, I try to make cuts that fall on grout lines whenever possible for a cleaner look. Outside corners benefit from mitered cuts that cover raw edges, but this necessitates accurate cutting abilities. Inside corners are often trimmed square with caulk rather than grout to accommodate expansion. Practice and patience yield the greatest corner outcomes.
What safety precautions should be taken during mosaic tile installation?
Eye protection is still required when cutting tiles, as chips can fly unexpectedly and inflict significant injury. I always wear safety glasses while performing cutting procedures. Dust masks prevent the inhalation of tile and grout dust, which can cause respiratory irritation. Knee pads protect extended floor work, while gloves guard against wounds from sharp tile edges. Adhesives and sealers benefit from proper ventilation to eliminate dust and chemical vapors. I keep a first-aid kit accessible and work at a steady pace to avoid fatigue-related incidents that could result in injury or installation errors.
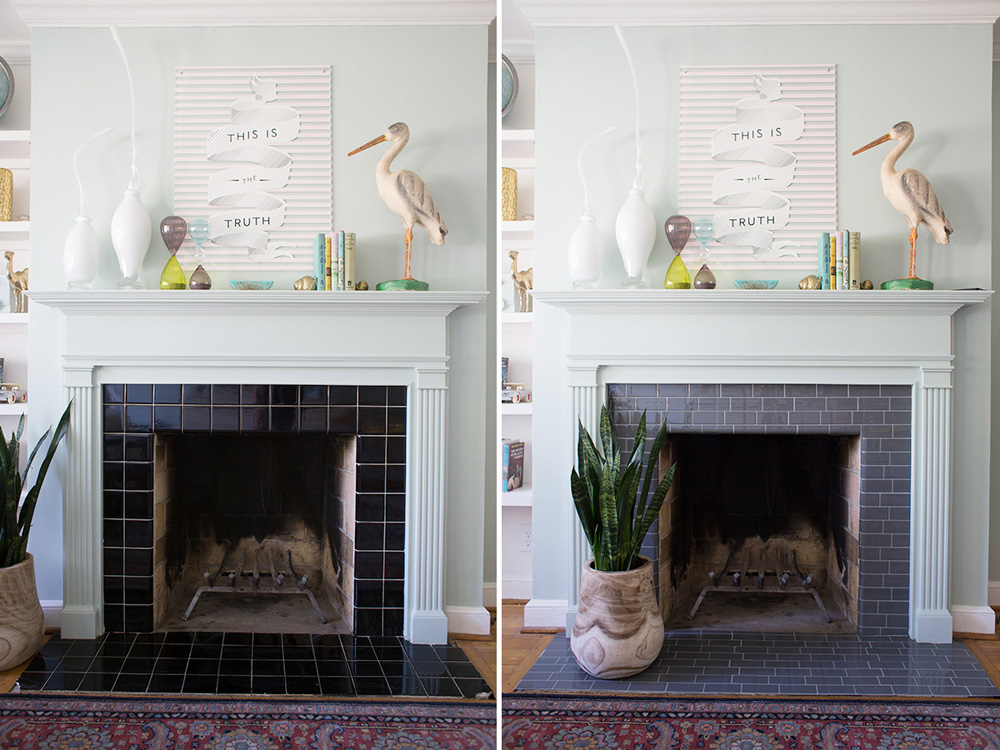
DIY Fireplace Makeover with Vinyl Tiles – Sew Much Ado

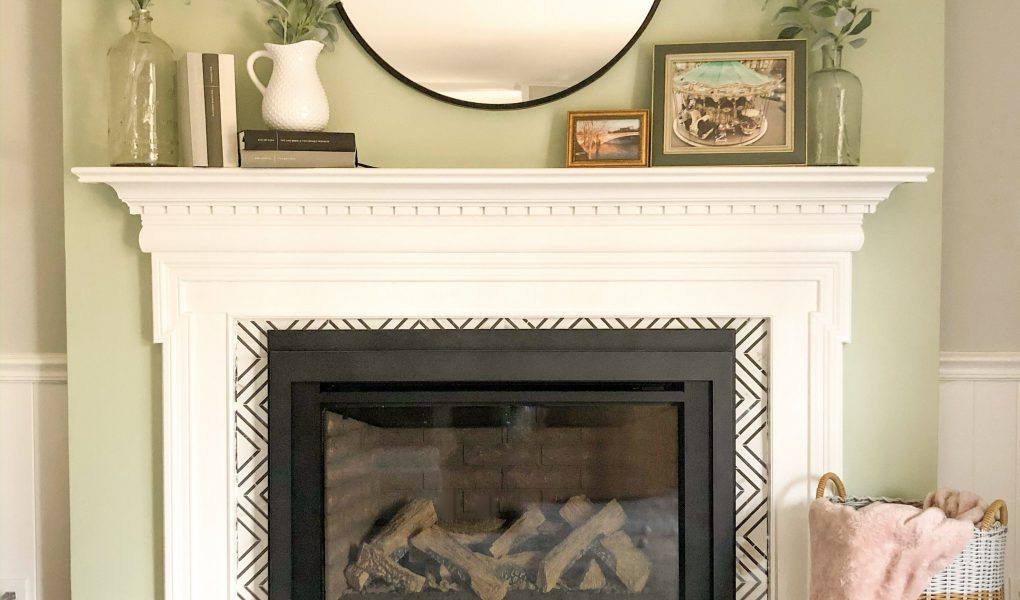
DIY Fireplace Renovation Tutorial – This Homemade Heaven
Related Posts: