Changing a fireplace insert can refresh the look and functionality of your hearth. Whether you’re upgrading for better efficiency, updating the style, or replacing a worn-out unit, understanding the process is key to a successful project. This guide will walk you through the essential steps involved, from preparation to installation, ensuring a safe and effective outcome. Remember to always consult your fireplace insert’s manual and local building codes before starting any work. Safety should be your top priority throughout the entire process.
Preparation and Safety Measures
Before you even think about touching the old insert, meticulous preparation is crucial. Begin by gathering all the necessary tools and materials. This typically includes screwdrivers (various types and sizes), wrenches, gloves, safety glasses, a vacuum cleaner, a drop cloth or old blankets, and potentially a pry bar. Having everything within easy reach will streamline the process and minimize interruptions. Next, and most importantly, ensure the fireplace is completely cool. Do not attempt to work on a hot fireplace insert. Allow ample time for it to cool down after its last use. Finally, turn off the gas supply if you have a gas fireplace insert. For electric inserts, unplug the unit and ensure the breaker is switched off for added safety. Double-check that there is no power running to the unit before proceeding.
Your safety should be paramount during this entire undertaking. Always wear safety glasses to protect your eyes from any debris that might fall or get dislodged during the removal and installation process. Heavy-duty work gloves are also essential to protect your hands from sharp edges or rough surfaces of the old and new inserts. Consider wearing old clothing that you don’t mind getting dirty, as the process can involve soot and dust accumulation. If the insert is particularly heavy or awkward to maneuver, enlist the help of another person to avoid potential injuries from lifting or straining. Remember, it’s always better to have assistance than to risk hurting yourself or damaging the new insert.
Protecting your home environment is another critical aspect of the preparation phase. Lay down a drop cloth or old blankets around the fireplace opening to shield your flooring and surrounding furniture from soot, dust, and potential scratches. This simple step will save you significant cleanup time later. If you anticipate a considerable amount of dust, consider sealing off the room with plastic sheeting to prevent it from spreading to other areas of your house. Proper ventilation is also important. Open windows or use a fan to ensure good airflow, especially if you are dealing with a gas fireplace, as there might be residual odors or gases present. Taking these protective measures will make the entire project cleaner and more manageable.
Removing the Old Fireplace Insert
The initial step in removing the old insert involves carefully examining how it is secured within the fireplace opening. Most inserts are typically held in place by screws, brackets, or sometimes just their own weight. Use your screwdrivers or wrenches to loosen and remove any visible fasteners. Keep the removed hardware organized in a safe place, as you might need some of it for the new installation, or at least to compare with the new hardware. Pay close attention to the order in which you remove the screws or brackets, as this might be helpful when installing the new unit.
Once all the visible fasteners are removed, try gently wiggling the old insert to see if it comes loose. If it seems stuck, avoid forcing it, as this could damage the fireplace opening or the insert itself. Carefully inspect the edges and look for any hidden screws or brackets that you might have missed. A pry bar can be helpful in gently nudging the insert free, but use it cautiously to avoid damaging the surrounding masonry or drywall. Work slowly and methodically, taking your time to identify any resistance points.
With the insert finally loose, prepare for its removal. If it’s heavy, have your helper ready to assist you in lifting it out. Lift with your legs, not your back, and maintain a firm grip. Place the old insert on a protected surface, such as the drop cloth you laid down earlier. Be mindful of any sharp edges or protruding parts. If you are disposing of the old insert, check with your local waste management for proper disposal procedures. Some materials might require special handling. Once the old insert is out, thoroughly clean the fireplace opening by vacuuming any soot, dust, or debris that has accumulated. This will provide a clean surface for the new insert.
Preparing the Fireplace Opening
After removing the old insert, a thorough inspection of the fireplace opening is essential. Look for any signs of damage, such as cracks, loose bricks, or deteriorated mortar. Address any necessary repairs before installing the new insert to ensure a safe and structurally sound installation. If you are unsure about the condition of your fireplace, it’s always best to consult with a qualified chimney sweep or mason. They can assess the structural integrity and recommend any necessary repairs.
Next, measure the fireplace opening carefully to ensure that the new insert will fit properly. Compare these measurements with the dimensions provided in the new insert’s manual. Pay close attention to the width, height, and depth requirements. It’s crucial to have the correct dimensions for a secure and efficient installation. If the opening is slightly too small, minor adjustments might be possible, but significant alterations should be made by a professional. A proper fit will not only ensure the insert looks right but also contribute to its optimal performance and safety.
Finally, prepare the necessary connections for the new insert. This might involve ensuring that the gas line (if applicable) is in good condition and properly positioned. For electric inserts, check the electrical outlet and wiring to ensure they meet the new unit’s specifications. Refer to the new insert’s installation manual for detailed instructions on the required connections. It’s crucial to follow these guidelines precisely to avoid any safety hazards or operational issues. If you are not comfortable working with gas or electrical connections, it is highly recommended to hire a qualified professional to handle this part of the installation.
Installing the New Fireplace Insert
Carefully unpack the new fireplace insert and inspect it for any shipping damage. Compare the contents of the box with the parts list in the installation manual to ensure that all necessary components are present. Read the installation manual thoroughly before proceeding with the installation. This manual contains specific instructions and safety guidelines for your particular model, and following them precisely is crucial for a successful and safe installation. Familiarize yourself with all the steps and diagrams provided.
With the fireplace opening prepared and the new insert unpacked, carefully position the new unit in front of the opening. If the insert is heavy, enlist the help of your assistant to lift it safely. Align the insert with the opening, taking care not to scratch or damage the surrounding surfaces. Gently slide the insert into the opening, ensuring it sits level and flush against the fireplace surround. Pay attention to any mounting brackets or guides that need to be aligned. Avoid forcing the insert if it doesn’t slide in easily; double-check the alignment and measurements.
Once the insert is in place, secure it according to the manufacturer’s instructions. This typically involves fastening it with screws or brackets. Use the hardware provided with the new insert, or the hardware you saved from the old unit if it is compatible. Ensure that all fasteners are tightened securely but not overtightened, as this could damage the insert or the fireplace surround. If you have a gas or electric insert, now is the time to connect the gas line or plug in the electrical cord, following the manufacturer’s instructions and local codes meticulously. If you are unsure about these connections, hire a qualified professional. After securing the insert and making the necessary connections, double-check that it is stable and properly installed.

Final Checks and Testing
After the new fireplace insert is installed, perform a thorough visual inspection. Ensure that all connections are secure, all screws and brackets are properly fastened, and that the insert sits level and flush within the fireplace opening. Double-check that no wires or gas lines are pinched or strained. Refer to the installation manual once more to make sure you haven’t missed any steps. A careful final inspection can prevent potential problems down the line.
If you have a gas fireplace insert, it is crucial to test for gas leaks. Use a soapy water solution around all gas connections. If bubbles appear, it indicates a leak, and you should immediately turn off the gas supply and call a qualified gas technician to address the issue. Do not attempt to operate the fireplace if you suspect a gas leak. For electric inserts, ensure that the power cord is properly plugged in and that the breaker is switched on.
Finally, test the operation of the new fireplace insert according to the manufacturer’s instructions. Turn it on and check that it functions correctly. Verify that the flames (for gas units) or heating elements (for electric units) are working as expected. Listen for any unusual noises or smells. If anything seems amiss, turn off the unit immediately and consult the troubleshooting section of the manual or contact the manufacturer’s customer support. Proper testing ensures that your new fireplace insert is operating safely and efficiently.

Maintenance and Care
Once your new fireplace insert is installed and functioning correctly, understanding proper maintenance is key to its longevity and continued safe operation. Regularly clean the glass front of the insert with a fireplace glass cleaner to remove soot and buildup. Follow the manufacturer’s recommendations for cleaning products and methods. Regularly inspect the venting system to ensure it is clear of any obstructions. For gas fireplaces, schedule annual professional inspections of the venting system and burner assembly to ensure safe and efficient operation.
For both gas and electric inserts, periodically inspect the surrounding area for any signs of heat damage or discoloration. Ensure that combustible materials are kept at a safe distance from the fireplace opening, as specified in the owner’s manual. Regularly check the condition of any seals or gaskets around the insert and replace them if they appear worn or damaged. Proper sealing is essential for maintaining efficiency and preventing drafts.
Finally, always refer to your fireplace insert’s owner’s manual for specific maintenance instructions and schedules. Different models may have unique requirements. Keep the manual in a safe and easily accessible place for future reference. Following the recommended maintenance procedures will not only prolong the life of your fireplace insert but also ensure its safe and efficient operation for years to come, providing warmth and ambiance to your home.

How do I know when it’s time to replace my fireplace insert?
Several indicators suggest it might be time to replace your fireplace insert. If your current unit is old and inefficient, upgrading to a newer model can save you money on energy bills and provide better heating performance. Visible damage, such as cracks in the firebox or damaged controls, can also necessitate replacement for safety reasons. Frequent malfunctions or a noticeable decrease in heating output, despite regular maintenance, are other signs that the insert might be nearing the end of its lifespan. Additionally, if you are undertaking a home renovation and want to update the style of your fireplace to better match your new decor, replacing the insert can be a significant part of that process. Consider factors like energy efficiency, heating capacity, and aesthetic appeal when deciding whether to replace your existing fireplace insert.
Can I install a new fireplace insert myself, or should I hire a professional?
The decision of whether to DIY or hire a professional to install a new fireplace insert depends on several factors, including your comfort level with home improvement projects, your understanding of gas or electrical systems (if applicable), and local building codes. Installing a fireplace insert involves careful handling of heavy objects, precise measurements, secure fastening, and potentially connecting gas lines or electrical wiring. If you are experienced with these types of tasks and are confident in your ability to follow instructions meticulously and adhere to safety guidelines, a DIY installation might be feasible. However, if you are unsure about any part of the process, especially gas or electrical connections, it is strongly recommended to hire a qualified professional. Improper installation can lead to safety hazards, inefficient operation, and even void the manufacturer’s warranty. Weigh your skills and the complexity of the installation carefully before deciding.
What tools and materials are typically needed to change a fireplace insert?
Changing a fireplace insert generally requires a basic set of tools and materials to ensure a smooth and safe process. Essential tools often include various types and sizes of screwdrivers (both flathead and Phillips), a set of wrenches, safety glasses to protect your eyes from debris, heavy-duty work gloves to protect your hands, a vacuum cleaner for cleanup, and a drop cloth or old blankets to protect the surrounding floor and furniture. Depending on the type of insert and how the old one is secured, you might also need a pry bar to gently loosen the old unit. For gas fireplace inserts, you will need a soapy water solution to test for gas leaks after installation. Ensure you have the new fireplace insert itself and all the hardware and components that come with it, as well as the installation manual for specific instructions. Having all these items prepared beforehand will make the installation process more efficient and less frustrating.
How long does it typically take to change a fireplace insert?
The time it takes to change a fireplace insert can vary depending on several factors, including the type of insert (gas, electric, or wood-burning), the complexity of the installation, your experience level (if doing it yourself), and whether any modifications to the fireplace opening are required. Removing the old insert might take anywhere from 30 minutes to an hour, depending on how it is secured. Preparing the fireplace opening, including cleaning and making any necessary minor adjustments, could take another hour or two. The installation of the new insert itself can range from one to several hours, especially if gas or electrical connections are involved. If you hire a professional, the entire process might be completed within a few hours to a full day. If you are undertaking the project yourself and encounter unforeseen issues, it could take longer. Allocate ample time for the project and avoid rushing to ensure safety and proper installation.

Are there any specific building codes or regulations I should be aware of when changing a fireplace insert?
Yes, it is crucial to be aware of and adhere to local building codes and regulations when changing a fireplace insert. These codes are in place to ensure the safety and proper functioning of your fireplace. Regulations can vary depending on your location, but they often cover aspects such as the type of venting required, clearances from combustible materials, proper installation of gas lines or electrical connections, and permits that might be necessary before starting the work. Before you begin the replacement process, it is advisable to check with your local building department or fire marshal to understand the specific requirements in your area. Failure to comply with these codes can result in fines, safety hazards, and potential issues with insurance coverage. Consulting with a qualified professional installer can also help ensure that your new fireplace insert is installed by all applicable regulations.
What are some common mistakes to avoid when installing a new fireplace insert?
Several common mistakes can occur during the installation of a new fireplace insert, which can lead to safety issues or operational problems. One frequent error is not properly preparing the fireplace opening by thoroughly cleaning it and ensuring it is the correct size for the new insert. Another mistake is neglecting to carefully read and follow the manufacturer’s installation instructions, as each model can have specific requirements. Incorrectly connecting gas lines or electrical wiring is a serious safety hazard and should always be done by a qualified professional if you are not experienced. Failing to properly secure the insert within the fireplace opening can lead to instability. Additionally, not testing the new insert after installation, especially checking for gas leaks in gas units, is a significant oversight. Finally, neglecting to maintain proper clearances from combustible materials can create a fire risk. Avoiding these common mistakes by taking your time, following instructions carefully, and seeking professional help when needed will ensure a safe and successful installation.

How to Replace Gas Fireplace Inserts

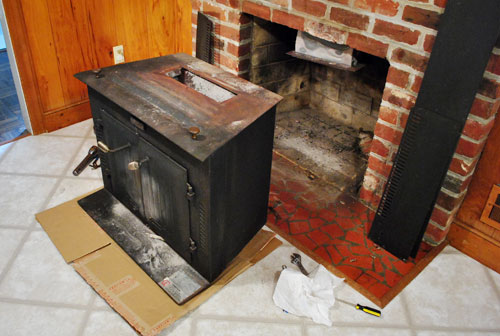
The Beginning Of A Fireplace Makeover: Removing A Woodstove Insert

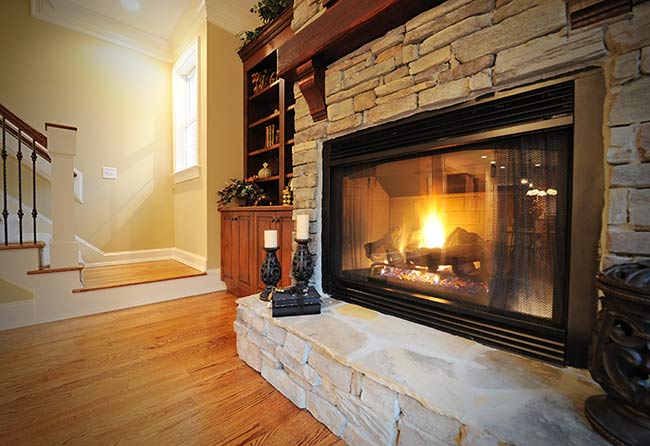
Let The Colonial Fireplace Insert Convert Your Fireplace Into a Highly Efficient Heat Source!

Related Posts: